
DIY Map Art- Visualize your travels!


Here are the items I used:
Watch my YouTube tutorial here to see how I made it!


~ DIY Candy Cane Vase ~


As always thanks for stopping by my blog and Merry Christmas!!!

I found the earmuffs themselves at a local dollar store called Daiso. These ran for a $1.50 and came in different colors. You can find some simple inexpensive earmuffs on Amazon.com as well.


The great thing about this project is that you can use anything from necklaces and earrings you aren't wearing anymore. The sky is the limit really, you just need to think outside the box as far as the different things you can use.
Check out my YouTube tutorial on how easy it is to create these.

Gift Wrap Presents Perfectly :)

Hey everyone finally I have a new video up on my Youtube channel! Come check it out here
Let me know what you think!!! I'll be back next week with another Christmas DIY project so stay tuned!
~ My Natural Spot Treatment for Blemishes ~
This tutorial is super easy and fun. I believe what you say and think can become reality and it wasn't until recently that I saw the outcome of this.


For as long as I can remember I have wanted to travel. To just be a gypsy and take to the road. I've always wanted to go to Ireland and this year I'm finally making it my reality!
That inspired me when I was browsing on Pinterest one day and saw some really great ideas for using maps. You can customize this however you would like and add as many cities or states or roads as you like.
I unfortunately forgot to take photos of the items I used but it's pretty self explanatory :)
Here are the items I used:
- 11x14 Floating frame- Jo Anns $7.00 on sale
- Paper of your choice
- Map or project paper- Jo Anns- $5.00
- Craft scissors- $3.49 on sale
- Exacto knife ( optional)
- Scissors
- Marker or calligraphy pen
Watch my YouTube tutorial here to see how I made it!
What cat doesn't like treats? Mine certainly do and these are so easy and inexpensive to make that you might never buy them from the store again.
Made with a few simple ingredients with a recipe I found on Pinterest , these can also be altered to make with wheat flour , or salmon.
Here is all you need:
- 1can of tuna ( I used cat tuna from Trader Joes)
- 1cup of Oat flour
- 1tablespoon of Organic catnip
- 1 tablespoon of olive oil ( add more if needed)
- 1 egg

Mix all the ingredients up with a fork
Using a 1/2 teaspoon roll into balls and push down with finger
Bake for 10-12 minutes at 350f and ta-da!
My kitties loved them. My other cat Diesel is too lazy to chew so I broke them in half for him. Spoiled!
This recipe made roughly 80 treats which is a lot!!
Cinder and the kitty treat jar are having to face off.
Check out my YouTube tutorial here:
~ DIY Candy Cane Vase ~
In this tutorial I'll show you how to make a super easy Candy Cane vase that is perfect for the holidays. I added my own little twist to this for the bottom but you can certainly do without.

Items used:
- Vase
- Candy Canes ( I used 3 boxes of 12 )
- Wired ribbon
- Cat collar ( yup! I said a Christmas cat collar lol)
- Glue gun & glue sticks
- Scissors
Watch my YouTube video here to see how I made it!


As always thanks for stopping by my blog and Merry Christmas!!!
~ Embellished Earmuffs ~
Inspired by Chanel #3
For those of you who watch Scream Queens on Fox, you will guess right away what this tutorial is about. For those who don't watch then this tutorial is perfect if you are wanting a unique and fun accessory that is a bit out of the norm.
No longer are earmuffs just for the cold. These can be worn to accessorize any outfit and the best part is you can customize them yourself for under $10.
No longer are earmuffs just for the cold. These can be worn to accessorize any outfit and the best part is you can customize them yourself for under $10.

I found the earmuffs themselves at a local dollar store called Daiso. These ran for a $1.50 and came in different colors. You can find some simple inexpensive earmuffs on Amazon.com as well.
Next was the decorating. For the first pair on the left I used materials I had lying around in my craft box and for the top of the headband I used a hair headband that I hadn't been using at all.
For the other two I purchased some statement necklace parts at Michaels and for the pink pair purchased an inexpensive gold and rhinestone headband at a store in the mall.


The great thing about this project is that you can use anything from necklaces and earrings you aren't wearing anymore. The sky is the limit really, you just need to think outside the box as far as the different things you can use.
Check out my YouTube tutorial on how easy it is to create these.
~ Christmas/Holiday Table Arrangement ~
So one night I think I was watching the Vampire Diaries and their Thanksgiving episode, when I happened to notice the table arrangements on the dining room table. I thought they looked so cute and my favorite thing about Christmas is lights so here is my own version of a lighted table arrangement :)
I purchases most everything from Michaels with the exception of the lights which I picked up at Target.
Here is what I used
- Globe vase $5.99 plus got 50% off with coupon
- Glittered Pinecones $1.99 for 5
- Mini garland with accent ornaments $3.99 with 50% off
- Holiday Filler $4.99 with 50% off
- LED Twinkling lights from Target $7.99 with 50% off
Let me know if you try this and check out the video tutorial on Youtube here
Gift Wrap Presents Perfectly :)
One of my most popular videos on my channel is a tutorial I did the first few months that I was doing Youtube and it's a gift wrapping tutorial. Well last Christmas my mom gave me this great tip on how to do a seamless wrapping job so I thought I would make a video on it as well as how to make a loop bow.
Also check out my nails in the video they are the Nailhur set in "Uber Chic" that I mention in my previous blog post.
Let me know what you think!!! I'll be back next week with another Christmas DIY project so stay tuned!
~ My Natural Spot Treatment for Blemishes ~
I've been trying this method out for quite some time now and I thought I would share it. Even though I know that there are tons of posts and videos on it but I thought what the heck. I found this recipe a while back on a blog. Check it out here: http://dreamcalluna.wordpress.com/2013/04/22/diy-tea-tree-oil-acne-treatment/
Lavender and Tea tree oil have been used forever for various things including skin care. The combination of the two just adds a little more of a punch to those annoying pimples/zits that can pop up here and there.
Tea tree oil works well on acne, pimples, dark spots and any sort of cut or burn. Lavender is antibacterial and can help reduce redness around the area. Adding some distilled water simply cuts down on the potency of the oils.
So this DIY just involves three items:
Distilled water 
Lavender & Tea Tree Essential Oils
both from Vitacost.com
Lavender 1 oz.$6.49
Tea Tree 1 oz. - $5.99

Glass bottle dispenser with dropper
1 oz. from Sprouts - $1.99

Measuring cup (for a mess free pour)

Simply add one ounce of water to the container and then add 10 drops of Tea tree and 5 drops of lavender. Stir and then close bottle and shake. Shake before each use as well :)
Watch the Youtube tutorial here:
Loft Makeover - The "After"
Yes I know this is a week late and I apologize! I ended up hustling to get the room together because my brother was coming to visit for the week. After he arrived I got caught up in all the activities and decided to film the "after" when he left. So here it is!

Most everything in the room came from Target, and let me tell you that I found some deals.
Starting with the bed, I decided to angle it diagonally to give the room a different feel. I found this super soft and comfy comforter that is black on one side and grey on the other.
It's a twin size because since I don't have a box spring under the mattress, a full size was way too large. Only $19.99!!
Link here: Room Essentials Comforter
For sheets I found a microfiber set in this gorgeous coral color. They are so soft! Since I don't use the top flat sheet, I cut it up and used it to cover one of my Euro size pillows. Click here for the tutorial I did a few years ago on this pillow. It's so easy! I then added a black accent pillow and the silver sequin one I originally had on my bed. I thought it looked better here :)

Next were the curtains. I didn't want anything too heavy or dark, and as luck would have it I had a set of sheer black curtains from a previous house.

I believe I got them at Target a few years ago as a set for around $10-12. I didn't want to put holes in the wall so I opted for cafe spring rods which work perfectly.
Next to the bed I put a simple black lamp with this beautiful black and white lace shade that I found on clearance at Target. $3.98 guys! Can you believe it? I put it on this simple pedestal that I had in my hallway.

Here's the link for the lamp: Room Essentials Column Lamp Base $16.99
In the corner I put this simple IKEA like bookcase with an orchid to accent the room and some books and other decorative piece.

Link for book case here: Room Essentials 3 shelf bookcase in Espresso
Lastly was the large blank wall next to the bookcase. I had found yet another amazing find at Target. This beautiful gold starburst mirror set was only $7.98! I'm not sure why because it is on the website for $24.99, but I'm not complaining!

Link to the mirror set here: Threshold Starburst Mirror - 3 pieces $24.99

After bringing the mirrors up I decided that it needed a little something more. Since I had a few sheets left over of the IKEA wall decals, I arranged them as if they were coming down from the ceiling and suspended on the wall. I think it adds a perfect touch of dainty cuteness and pairs perfectly with the mirrors.
Link to the decals here: SLATTHULT Decorative Stickers - $12.99
And that's it! I love the simplicity of everything and how the coral, black and grey make it slightly masculine but with a feminine side as well. I might add one or two more things like something else on the wall above the bed, and possible a small desk so I could make it my office. I'll keep you posted on any changes!
Loft Makeover- The "before"
So I've been wanting to redo the small loft space in the house for quite sometime now. Just like it was with my bedroom and bathroom, this will be a makeover on a budget. No major changes, just some simple ones that don't cost a lot but that can make a space inviting and special. Here is a pic of the ladder leading up to the loft. I left my white Christmas lights up because I love the way this looks at night.

As you can see the opening at the top isn't very big at all. We were just able to get a mattress up and a few smaller items. You can't really bring big stuff up here.

Here is a shot of most of the room.

The ceiling is low, I would say maybe 7 feet. The big windows really open it up though so it doesn't feel as small as it really is.
Can't wait to show you the after so stay tuned for next week's video for ! Also if you are reading this blog, please sign up through email or join me on Google!
Watch my Youtube video here:
Watch my Youtube video here:
"Do it Myself Monday"
Room Makeover Series Part Four
I'm back with part four! I decided I would go ahead and show you what I have done thus far. I still have one or two more key items to finish/find so once that is all completed I'll film a final video for you. First thing I did was change the position of the bed. I had originally thought blocking the window would be a bad idea but I was wrong. It gives SOOOO much more room to the whole area and really just makes everything feel fresh and welcoming.
I found this gorgeous reversible duvet set at T.J. Maxx for only $29.99. It's super soft and has the exact colors that I had in mind for the room. A light grey with white and on the reverse side is a mustard like yellow with white.
I picked up a black sheet set from Cynthia Rowley also at T.J. Maxx for only $24.99. I love how the black makes everything stand out. Finding the right accent pillows isn't always easy, but this yellow one fell right into my cart while I was at Target and was only $10 on clearance. The grey sequin pillow I had from a previous comforter set.

On the left side of my bed I bought something that I had been wanting forever. A glass DETOLF cabinet from IKEA that could display the pretty tea cups and figurines that I have collected. A small round wood table I already had makes a perfect nightstand, accented with a speckled glass vase I purchased from Michael's for only $4.99 and paired with TORKA dried flowers from IKEA to accent the black and yellow color scheme perfectly.

The IKEA bookcase I had on the other wall showcases perfectly on the other side of the bed. I took the old vintage mirror and turned it sideways, and then propped it up against the wall. This too opens up the room so nicely. The accessories on this bookcase aren't complete yet so I will post pictures when I am finished.

And that's it for right now! I will be adding some more pillows to the bed as well as purchasing a new computer desk that will help the area be a bit more organized. I also haven't decided it I will refinish my desk or put something else there. Stay tuned though and make sure you check out my Youtube channel and subscribe if you haven't already :)
"Do it Myself Monday"
Room Makeover Series Part Three
Part Three is here! It's time to show you my finished bathroom.
Watch part three here:
I picked out the color scheme to go along with my bedroom which you will see when that's all finished, so I guess you can tell that at least part of the colors will be grey and white :)
It all starts with a good shower curtain for me.

I found this in the clearance section at T.J. Maxx for only $10! It's Cynthia Rowley brand and I loved how the color accents matched up with the tiling in the bathroom and especially that lovely 70's green of the bathtub. The hooks were ones I had used in a previous bathroom and I purchased them at Target a few years back. I broke them out again because they go perfectly with the grey and silver accents I have.

I picked up some green towels also by Cynthia Rowley to hang on each towel bar. Then there is the grey terry/foam bathmat from Target and I believe was around $16.

The stainless steel trash bin I found at Ross for only $7.99. I was floored by this purchase because it's such good quality and the ones I had seen elsewhere all ran over $20.
The biggest purchase was the tall white cabinet that I picked up at IKEA. It's from the Fullen series and was $49.


You can find it on the website here. It's perfect to house some bathroom necessities and I like the mix of a cabinet to conceal things and also the pretty glass shelving to display things.
My favorite part of the bathroom has to be this IKEA decal on the wall. Isn't it cute?

Just like the one I have in my closet on my mirror, this one I believe came with around 12 sheets or so of different branches and birds. It's called "Slatthult" and you can find on the website here. For only $12.99 you can't beat the gorgeous look it gives to a wall. It's so different from just putting up a framed art piece or picture. You can arrange it in any pattern you wish, so I opted to just kind of have it floating on the wall.
I also put a few pieces on the wall near the washer and dryer just to tie it all in. On another note, I still might end up putting a valance up on that window. The shade ended up breaking and so I'm not sure if I'm going to replace it or put up a curtain.

For the bathroom sink, there wasn't much I could do other than find a cute little owl soap dispenser (already filled with soap!) at T.J. Maxx for only $7.99. I think it's perfect and just simple and not too distracting. That tiled counter is enough! The toothbrush cup is actually a candle jar that I used up and cleaned out. I think it's also Cynthia Rowley.

Over the toilet there is just enough room for a basket for magazines and a candle. On the wall I put up this adorable mirror I found on clearance at Target for only $8.98.

It looks expensive but is actually quite light. That's why I love getting deals because why pay for expensive things when you might want to change it in a few months? You can find things that look like $100 for only $8!
Decorating with mirrors are great because they can really make a small space seem so much larger.
Last is the small awkward sink that I couldn't really do much to other than organize and de-clutter.
I took everything off the counter except for a silver container that holds my cotton balls and a simple glass cup for my q-tips. I wanted it clean and simple here. The silver container I actually found a few months ago at , you guessed it T.J. Maxx for only $2.50 in the clearance section!

I kept the square black shelf up and re organized it with the skin care products I use every day. Everything else I put in the new Ikea cabinet

And that is it! I know to some it's not much, but for someone on a budget it's a very nice change to a dull and dark bathroom. I love how light and bright it makes the room feel. Just remember you don't have to completely remodel a room to make a change. Like with clothes, accessories are everything. Sometimes you have to hunt for deals but sometimes fate steps in and you stumble upon them!
I have a few things left to do in my bedroom so I'm not positive I will have them done for next weeks' video and blog post, but it's coming soon I promise. Stay tuned and happy hunting!
"Do it Myself Monday"
Room Makeover Series Part Two
Welcome back to Part two of the Room Makeover Series! So first up is the closet reorganization project. If you watched my "before" video you know that the closet area was a hot mess.
Now keep in mind my whole purpose to this series is to show that you can redecorate and organize on a very minimal budget. That said, I first went through my closet extensively and got rid of a TON. I then reorganized and decided what existing containers I could use and what I needed to purchase. The purchase list I can assure you is very small. Goes to show you that there are so many things you have in your house already that you can re purpose.
I decided first thing to purchase another dresser and to move each one to its own side. This really opened up the closet a lot.

I went to IKEA and found the "Hopen" dresser which has glass front drawers. I loved the look of this. It was very reasonable too at only $99

I moved the existing dresser that was originally in the middle to my side. I removed the lower bar to do so which was very easy. The over the door hooks I was originally using to hold my purses now hangs over one drawer to display the current bag I'm using.
I purchased a basket at T.J. Maxx (top shelf) for $7.99 to house my purses. To the left I have my jackets, dresses and skirts. Below that I have a roller drawer cart to hold all my craft supplies.

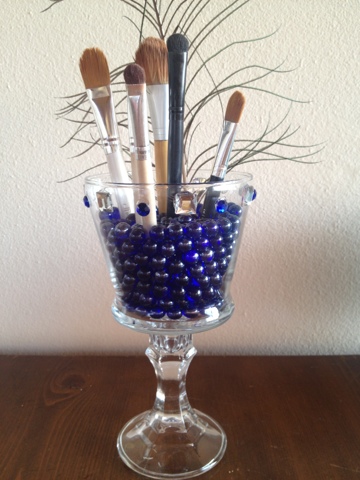
On top of my dresser I have a vase to hold my sunglasses, a necklace display for my most used small necklaces, a bracelet display, my watches, and a wine glass I decorated to hold my small bracelets and a pair of fancy earrings.

Lastly is the center area which at the last minute I decided I wanted it to be my vanity area. I didn't really like the idea of using my desk as a vanity and having everything out in the open in the bedroom area.
The only problem was finding a desk or table the correct size. The area in front of the mirror is only 32 inches wide and I couldn't find anything that fit, plus I didn't really want to spend much more thant $20 anyway. On the day I was reorganizing and moving things around I happened to look at the table I have in my entry way. Would it fit? Only way to find out was to move it in. It didn't end up fitting with the straight edge to the wall, but it did fit with the curved end. The front now looked a little bare so I decided to spruce it up with some rhinestone embellishment. I had also found these really cool decals at IKEA that you can use on mirrors or walls so I decided one at the top of the mirror added a nice touch.

From this angle you can see the corners on the rounded side were open. I had picked up these two plastic file holders at Target for a $1.00 each. Wouldn't you know they fit perfectly in each corner? I simply put a nail on the far side and hooked it through and then the other end rests perfectly on the vanity. Perfect to hold my makeup!
An IKEA vase for $1.99 with some Spring vase filler is perfect for my brushes. The cute "Dream" frame I picked up at Target for only $4.98. Next I had this set of different size cubes that typically you hang on the wall. I thought they were perfect to give a little height difference and dimension to the vanity. On top I places one of my previous bathrooms toothbrush holder to house my eyeliners and pencils, and then a cute mirrored jewelry box I had purchased over a year ago turned out to have the perfect sized drawers to hold my individual eyeshadows.

To the left on the wall I hung this necklace holder I purchased at Michael's for $4.99. I have a few large necklaces that I think are really pretty to look at so it just fit perfectly.

The only two things I have left to finish is some sort of lighting for the vanity area so I can properly see my makeup, and then the vanity stool. It's an old thrift find that's falling apart and I'm not sure if I'm going to refinish it or just find something else.
So that concludes Part Two of this series. Stay tuned for more and make sure you leave comments on here or on my Youtube videos of anything you would like to see or things you have done!
" Do it Myself Monday"
Room Makeover Series - Part One
Hey everyone! So I decided to kick off a little video series where I makeover and reorganize my room, bathroom, and closet. It seemed easier to just do it in a few parts. The one problem I ran into for blog purposes is that I forgot to take before pics!
I can show you pics from when I first moved in so you can see what the room looks like without all the mess.
I can show you pics from when I first moved in so you can see what the room looks like without all the mess.


Here is the walk in closet. Those doors were taken off.

As a kid I used to rearrange my room quite often and my mom would help me redecorate since she was such a wiz with the sewing machine. It taught me that you can decorate beautifully on a very minimal budget.
So if you are wanting a change but don't have a lot to spend, don't be discouraged! There's always a way :)
So if you are wanting a change but don't have a lot to spend, don't be discouraged! There's always a way :)
Check out the tour of the room right before I started redoing it, and stay tuned by subscribing to my Youtube channel here:
~ DIY Gluten Free Rice Krispie Treat Pops ~
I wanted to make something not only Gluten free but also easy for Valentine's Day, and I think these are the perfect fit! You could have your kids make them for school or just for your family and friends or sweetheart.

The ingredients are minimal. Here's what you need:
- 6 cups Gluten Free Rice Crisps - Sprouts $3.99
- 10 oz. bag of Marshmallows
- 3 tablespoons of Butter
- Cooking Spray
- 9x13 glass pan
- Spatula
- Heart cookie cutter - Target $2.99 (came in a set of 4)


For the decorations:
- Lollipop sticks- Michael's $1.99
- Candy Coating- Target
- Sprinkles & crystal sugar- Dollar section Target

Packaging items:
- Party Bags (20ct) - Michael's $1.99
- Ribbon- Michael's $0.99
- Scissors

Watch my Youtube Tutorial here
:
Just like decorating cookies! So easy and fun to do with all the different variations.

Make sure you hastag #aimtocreate on Instagram if you make these and please leave a comment here or on my Youtube tutorial!
Happy Valentine's Day to you all :)
~ DIY All Natural Cleaner ~
Making my own all natural cleaner is something I have been wanting to do for quite some time now.
Using all natural cleaners are a good choice for a few different reasons:
- They are safe for not only you but also your children and pets
- They are cheaper !
- They are not harmful on the environment
So I hopped on Pinterest and started looking for some recipes to make a nice all purpose cleaner.
Items I used:
- Empty spray bottle ( you can reuse one from your other cleaners just rinse out and clean thoroughly)
- Distilled white vinegar
- Lemon essential oil ( I used my Lemongrass oil)

Watch my Youtube Tutorial here:
I used this on pretty much everything and it cleans mirrors really well! The scent of vinegar only lingers for a little and then the lemon takes over :)
~ DIY Ankle Chain ~
Yay I'm back with an all new "Do it Myself Monday". I've been planning to do this one for months now, but with the holidays it got pushed back due to wanting to give you holiday DIY's :)
I've done a few tutorials on how to embellish your shoes and the great part about this one is you don't actually have to alter anything on your shoe. This idea is great if you have a special event or evening out or simply just want to jazz up your look.
Items used:
Large & medium chain
Michael's $2.99 each (use your 40% off coupons!)

Jump rings & Lobster clasps
Michael's - $2.99 each

Bead Gallery embellished chains
Michael's $5.99 with an extra 40% off


Watch my Youtube tutorial here
Finished look!


Make sure you comment or leave me a hashtag on your pics if you try this!!
~DIY Cookie Mix in Decorated Jar ~
I was inspired to make this DIY after I was actually given one as a gift for Thanksgiving. This is the cutest idea for a gift or to bring to a Christmas party, and so easy to make.
Items you need:
Jar Decoration:
- One quart mason jar- Michael's $1.99
- Doily ( mine is 8 inches) you can also cut a piece of fabric to fit - Michael's $1.00
- Ribbon ( I used wired ribbon ) - Michael's $2.50 on sale
- Sticker embellishments- Michael's $1.99
- Tag ( got mine from an old Christmas bag)
- Elastic string- Had some in my stash but Michael's has it!

Items needed for cookie mix:
Fill jar in this order
- 1 1/2 cups flour
- 1 tsp. Baking soda
- 1 tsp. Baking powder
- 1/4 tsp. salt
- 1 cup of oats
- 3/4 cup chocolate chips
- 1/2 cup of brown sugar
- 1/2 cup of sugar

Watch my Youtube tutorial here
Once it's all packed cover the top with your doily or fabric and tie a simple bow around to secure.

Pop a sticker embellishment on the front for an extra touch

Lastly write on a tag or card the instructions on how to make the mix:
- Mix with one egg
- 1/2 cup melted butter
- 1 tsp vanilla
Roll into balls and bake @350 degrees for 10 minutes. Makes around 2 dozen
Thread some elastic through, knot at the ends and slip of the top of the jar. That's it!

I've seen these on line and they run anywhere from $15- $20 or more. For that cost you could make a few of these at least!
~ DIY Mosaic Christmas Ornament ~
Today I have a Pinterest inspired DIY project for you. I was so excited to try this out and even more excited to share it with you. Make them as gifts or fill your tree with them. I love the way the light catches the mirrored CD, and most likely people will think you paid a lot for them!
Best part is you can probably find the main item right near your computer. Here are the items you need:
Plastic globe Orament $1.99- Michael's
Blank CD ( new or old )
Rhinestones of your choice

Glue & Scissors

Watch my Youtube tutorial here
Finished project!
Finished project!


Let me know if you try this and make sure to post a pic on Instagram and hashtag #aimtocreate
~DIY~
Christmas Floral/Candy Arrangement
It's that time of year again! It came way too quickly but I'm not complaining. I love to do Christmas DIY projects so here is one that is not only super easy and inexpensive, but also something you can bring as a gift to a party or use right in your own home.

Now my version is a very inexpensive and on the smaller side. However you could make this a really large arrangement and if you wanted to give it as a gift put more expensive chocolate or candy in the vase.
For mine, all of the items are either from the dollar store or Michael's who was having a big Black Friday weekend sale.
I believe that it cost me under $8 to make!
Here's what I used:
Vase- $1.00- Dollar store

Paper towel core

Chocolate candy -$0.50 a bag from Dollar store
Bought 4 bags

Two bunches of Poinsettias- $.99 each at Michael's

Holiday picks- $.75 each at Michaels

This idea can be used with different types of candy and chocolate. I saw some on Pinterest that used Candy cane sticks and other peppermint candy that gave such an adorable look.
Please leave me a comment below if you have tried this or end up trying it and also hashtag me on Instagram with a pic! #aimtocreate
Please leave me a comment below if you have tried this or end up trying it and also hashtag me on Instagram with a pic! #aimtocreate
~DIY~
High heel Shoe Repair

I'm completely guilty of neglecting the tips of all my high heeled shoes. I've let them wear down to the nails, sounding like a horse trotting on a cobblestone street. I've skidded across floors in the mall or restaurant nearly ending up on my ass from my heels being so slick. Those days are over!
I wondered though, am I the only one who didn't think to replace the tips of my heels? Have others looked at the worn down rubber and said " ah I'll just get rid of these" when the shoes themselves are in almost a brand new like state? What a shame to get rid of your favorite shoes when they can be saved for such a small price. So many times I had made mental notes to bring them to the shoe repair, or order the replacement tips online but to no avail.


Walking through the mall last week it finally hit me when I passed a shoe repair store. "Here's my chance", I thought. Walking out with $7.00 less in my pocket I felt so good. Now I could wear my favorite boots just in time for the cold weather.
Now putting the new tips on is the easy part. It's the taking them off that can be a bit more of a challenge. See if you are like I was, and you let it wear all the way down to the nail, you need a good pair of pliers and some patience to get them out.
Once that's done all it takes is lining up the new tips correctly and tapping them back into the hole of the heel with a hammer. Easy as pie!


Watch my Youtube Tutorial here
Please don't be like me and wait too long to replace your heel's tips! Thanks for reading guys and make sure you leave me a comment!
~DIY~
Embellished Gloves, perfect for Christmas gift!
During a trip to Forever 21 over the weekend, their finger less gloves caught my eye. I noticed they had an assortment of different types but the ones I liked most were embellished with rhinestones :) What girl doesn't like a little sparkle right? But then I thought, well I could make that.


So I grabbed a pair of their non embellished ones and then stopped at Michael's for some materials.
After getting home it occurred to me that I had a longer pair of gloves stowed away with my winter scarves. Raiding my craft box, I found some some pearls and decided I would go ahead and make a second pair for my DIY this week.
What you'll need :
Finger less or fingered gloves
Shorter pair $5.80- Forever 21

Needle, thread, scissors

Pearls from Michael's $1.00 a strand

Embellishments from Michael's bead section
Bead Gallery on sale 50% off- $3.00 each strand

Watch my Youtube Tutorial here
Finished product!

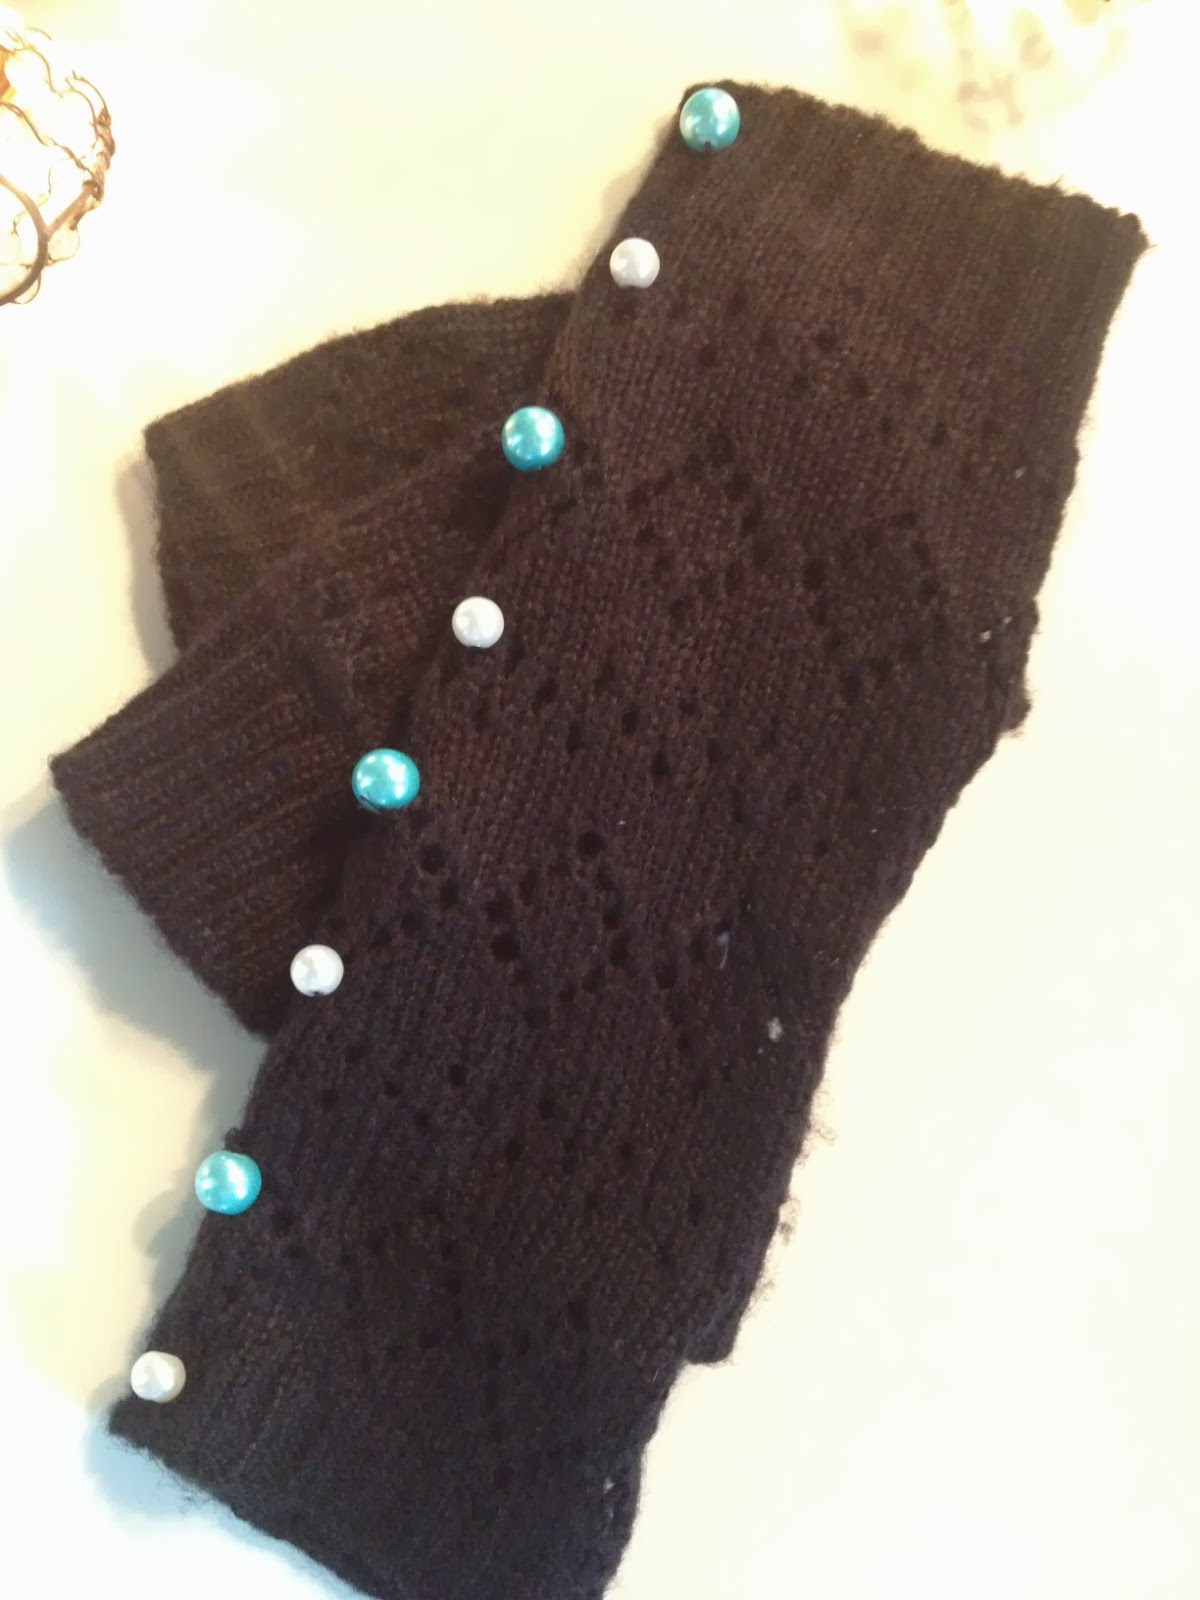
I think these make such perfect Christmas gifts and you can really make them unique to the person you are giving them to. Everyone loves a homemade gift:) If you try these out make sure you comment or leave a pic on my Facebook, and or hashtag me on Instagram #aimtocreate
~ DIY- Makeup Brush Holder/Case ~
This is a great idea to store your makeup brushes for either a trip or just at home. The placemat provides a clean surface for your brushes and it keeps them all very compact and together.
The items you need are:
Bamboo placemat- $1.50

1/2 inch black elastic- $2.00
Black satin ribbon- $1.00
Scissors & Glue gun

Here is the finished product


Let me know if you try this!!
~DIY Grapefruit Face Toner ~
As always I'm looking for natural remedies for my skin. I came across a really easy way to tighten your pores (especially if you have oily skin or an oily t-zone) so I thought I would share it with you.
Grapefruit can have several different uses for the skin. One is to help with oily prone skin as I mentioned, due to it's toning and astringent like effects. Two is the scent itself can improve your day!
The scent of grapefruit is known to have an uplifting, energizing effect as well as stimulating the lymphatic system. It can help with headaches, depression, exhaustion and is a great stress reliever and can ease muscle fatigue and stiffness.
It's a win win with this easy to make toner.
Here is all you will need:
Here is all you will need:
Distilled water

Grapefruit Essential Oil & Glass Spray bottle (1 oz)

Fill the bottle with the water and add 8 drops of the oil and you are set!

After cleansing, spray all over your face and let dry. Enjoy the tightening and refreshing effects!
~ DIY ~
Halloween/Fall Decorated Pumpkins
I love pumpkins, but I'm definitely not the best at carving them. Not to mention they don't usually last like they did when I was a kid, so you usually end up tossing them out before the season is even over.
So this year I decided I wanted to make some pumpkin decorations that would last through the years, plus who's kidding here. I love me some fancy decor :)
Off to Michael's I went in search of some foam pumpkins. Now while regularly priced they aren't exactly cheap, good ole' Michael's was already have huge discounts on them and we aren't even in the second week of October yet.
I also headed over to the Dollar store where I had heard they had some foam one's as well. Not quite as big, and a little crude to the eye I snatched some up with the idea in mind that I would be leading them through a transformation.
Michael's foam pumpkin: $8.99 regularly with 50% off.
Dollar store pumpkin : $1.00 (duh:)

Pinterest had given me the inspiration to use some lace tights pulled over a pumpkin. I just so happened to have a spare pair in my closet that I didn't need anymore :)

The lace detail is so cool once pulled over the pumpkin!

I picked up a 8 inch black lace doily I found in the dollar section at Michael's

Another dollar section find, but was $1.50. It's 3 yards of rhinestone trim! What a deal!

These cute Halloween picks were $2.99 with 40% off
I use all four for both pumpkins so was definitely worth it

I simply couldn't resist this little guy. How cute is he!!
$2.99

Lastly you need some scissors, some good glue,
and a clear rubber band

Watch my Youtube Tutorial here:
Here is finished pumpkin #1
How cool does that tight lace look? So much easier than painting or drawing!

#2... I love the vibrant orange peeking through the black!

Another bargain I found that I had to have is this adorable black cat. Now that I have a black cat I've been keeping my eyes peeled and this was a score. $7.99 with my 40% off coupon!!
Also the gold little gourd on the right I cut a small hole in to fit the candle. Another great decor idea, especially for the dining room table!

~DIY~
Embellish/Revamp your shoes!
I love revamping things from my closet and shoes are no exception! I've had these black lace heels for a while now and decided they needed to be jazzed up a bit to provoke me to wear them a more. Literally anyone can do this project, even a kid it's so easy. In fact a perfect shoe would be Keds since they are canvas and would take well to the paint.
These heels were actually quite cheap when I bought them last year at Ross, I think they were $16.99
I picked up this Tulip Puffy Paint at Wal-Mart for $0.97 each!
Michael's has a huge assortment of colors and textures as well.

Watch my Youtube Tutorial here:
You could do so many different shapes and patterns if you wanted to. I stuck to a simple pattern with just outlining the edges, but I like the simplicity of it and how it just adds a pop of color to the shoes.

Not every dot is perfect but these are one of a kind so you can't go wrong!


Let me know if you try this and hashtag your pics with #aimtocreate!
~ DIY ~
Decorative Fall/Holiday Candle Holder
"Do it Myself Monday" brings another easy and simple project just in time for fall.

The one that I came up with reminds me of something I would see in a Potter Barn or Z Gallerie store.
All you need these few items:
All you need these few items:
Glass Cylinder Candle Holder
Michael's $3.99

Fall foliage picks
Michael's $0.99 and $1.99
.jpg)
Scissors & Glue
Aleene's Glass & Bead Adhesive
(I decided to try a different kind of glue this time)

Watch my Youtube tutorial here
Here is the finished project
Here is the finished project

And that's it! These would make perfect additions to a dining room or coffee table for the Fall.
Of course you can also use Christmas picks for the upcoming holiday season! Let your imagination run wild!
~ Do it Myself Monday ~
Gluten Free Facial Cleanser/Body Scrub
So it's no secret that have been focusing my beauty regimen to be more natural and organic. Well I have also been focusing my eating habits to try and be more Gluten free if possible. While looking up recipes on Pinterest I came across this recipe for a Gluten free Facial Cleanser which can also pass as a body scrub. For those who are extremely gluten sensitive or have Celiac disease, Gluten can be absorbed through the skin, so this is definitely something for you!
As many know Coconut oil has been all the rage lately with uses ranging from cooking to hair, skin, etc etc. Grapeseed Oil is also another handy thing to have around the house for multiple purposes. First off it's the less expensive of the various oils that are multi-purpose. It's a light oil so it absorbs quickly, and it's odorless. Just like Coconut oil, you can use this in your hair (great for dry scalp) and your skin. It helps regulate oil which is perfect for oily skin and it's filled with Vitamin C which is a big plus.
Here are the ingredients you will need for this cleanser/scrub:
- 1 Cup Organic Virgin Coconut Oil
- 1/4 Cup of Cold pressed Grapeseed Oil (I am using a Grapeseed oil that I picked up in the beauty section of my health food store, however you can use the oil from the cooking section as well)
- 1 Cup of Raw Sugar

You will need also:
- Measuring cup
- Bowl
- Spoon
- Container with lid (I'm using a glass mason jar with a plastic lid)

Here is what it looks like all mixed and ready to go

I also have been trying out for the past few months oil cleanses for my skin and using Avocado Oil as a moisturizer, both which have really worked wonders. I came across these methods from a fellow Youtuber named Kassie and her channel CloudyApples
Check out my Top Favorite Skin Care Products here where I talk more about this
~ Do it Myself Monday ~
DIY - Turn a Necklace into a Headband
I just love this idea and how you can switch one item back and forth for two different uses!
I had looked through my jewelry collection for a necklace that would work for this project but couldn't find any. So off to the store I went in search of a good bargain. I came across this simple yet unique necklace at Kohls. I like how there is movement to the necklace instead of it just being flat. Just make sure that it is the right size for your head and you are good to go!

I found it on the clearance rack.
Regularly $24 marked down to $4.80!

When looking for a necklace, one with this type of closure is best

Now all you need is a hair band and some pliers

Watch my Youtube tutorial on how to make it.
This is how it's attached

Finished product


If you have tried this or are going to make sure and comment!
Also check out my Youtube Channel for more DIY's
~ Do It Myself Monday! ~
DIY- Cat Toy
'Today I'm launching not only a new name for my blog and Youtube Channel also "Do it Myself Monday" which will be a weekly series on my channel. So stay tuned and make sure you subscribe!
This project I saw on Pinterest a while ago back when I first adopted my little boy, and had been meaning to try out. I finally got around to it (after saving up some toilet paper rolls!) and decided to film it.
The items you need are:
- 1 Empty Tissue Box
- 14 Toilet paper cores
- Glue
- Scissors
It's super easy to put together and doesn't cost anything more importantly. You don't want to put a lot of money or time into this just in case your cat rips it to shreds!


Here's the finished product! Crude looking but serves the purpose :)

~ DIY Cotton ball & Qtip Holder ~
I've been forever searching for perfectly sized holders for my cotton balls and Qtips for my bathroom. I have VERY limited counter space so it's very hard to find something that isn't overly large. When I spotted a picture on Pinterest of a plain mason jar and candle holder, I thought it was perfect. So I decided to add my own little touch to make it mine.
Here is what you will need:
Small mason jar, votive candle holder, Acrylic paint
(good for glass), paint brush

The paint is from Martha Stewart in the color "Titanium" $2.99
The paint brushes is from Michael's $3.99
You could also use a cheap sponge brush.

Check out one of my previous DIY's where I use the same painting technique on clear vases.
Here are the finished products. It took 24 hours for the paint to completely dry.

Here they are put together and holding the cotton balls and Qtips

Here is another idea for a cotton ball holder or even a ring or bracelet holder. I used a simple wine goblet and did the same painting technique and embellishments.

Watch my full tutorial on my Youtube channel here:
Make sure you leave a comment if you try this!
~ DIY Tshirt Bag - No sew! ~
I realize this DIY would have been perfect for the beginning of the summer. Believe me I had every intention of doing that! However circumstances prolonged this diy and so without further ado here it is :) It doesn't involve any sewing which is a plus for something quick and easy. Plus it's kind of one of those laid back type of looks for a bag which is always good to have!
What you will need:
~ Tshirt ( I cannot find the picture I took! You can use any tshirt really with any neckline. Just make sure it's not too small for a bag size) I did find the t-shirt at Michael's on sale for only $3.00
Beads with larger holes
( you will need them bigger to fit the fabric through)
These are from Jo Ann's around $2.99 a piece (I didn't even use all of them)

Scissors & Measuring tape

Here is the finished product

Here is one I made with no beads

This is the first one I tried. I think it's cute with a graphic tee

Leave a comment or take a pic and hashtag #discoveringamy if you end up making one! I want to see your creations :)
~ DIY Turmeric & milk Face Mask ~

Recently my skin has been really acting up, especially in the cheek and chin area. I'm not sure whether it's weather related (it's been up and down in temperature and unusually humid) or me needing to drink a little more water:) Also, I have been noticing a few dark (sun) spots starting to appear on my face and to be honest it's kinda freaking me out. So I jumped on Google to research some natural fixes/cures for dark spots, and I found that Turmeric not only helps reduce them but it also helps with acne, wrinkles, rosacea, dark circles etc.
Turmeric is a spice that is hugely popular in Southeast Asia , and a tradition for Indian brides to use before their marriage day.
The benefits of Turmeric are pretty vast. It's rich with antibacterial, ant inflammatory, antioxidant, antiviral, and anti fungal properties. in addition it is packed with protein,Vitamin K, potassium, niacin, copper, Vitamin C, calcium, sodium, Vitamin E, iron, and zinc.
The biggest thing I was amazed to discover during my research is that Turmeric has a huge other list of benefits besides helping the outside of your body/skin. Here's a list:
- Prevents cancer! ( I know right!)
- Prevents liver disease
- Prevents Alzheimer's disease
- Improves digestion
- Helps maintain body weight
- Boosts your immune system
- Reduces cholesterol level
- Helps treat diabetes
- Relieves arthritis
- Heals wounds & burns
Is there anything this spice can't do? Seriously, it's pretty darn amazing. Now onto the face mask....
There are many different variations you can do with this mask (which I will list below) but I opted for what I had right in my kitchen at the moment. Here is all you will need for this mask:
- Turmeric
- Milk
- Bowl
- Tablespoon
- Spoon (to mix and apply)

Take 1 Tablespoon of Turmeric and add enough milk to make into a paste that's not too watery and not too dry. You don't want it to drip or drop off of your face once you apply it.

Now since Turmeric can stain your finger nails and hands, I found it easiest to apply the mask with the back of a spoon. It really got it on there evenly as well.
Here's the finished look :)

Leave the mask on for 10-15 minutes or until it's dried up. Use warm water to take off and then finish with a hot washcloth.
I instantly felt and saw the results. My skin was as smooth and soft as a baby's bottom and I noticed some of the spots from left over breakouts and even my sun spots seemed lighter. I did notice a slight color change to my skin but it faded quickly and wasn't noticable at all. You might want to do this at night just in case.
I am definitely going to be using this mask a lot.
Some other things you can combine with Turmeric for masks:
Milk of course (great for dry skin)
Coconut Oil (great for oily skin)
Honey & yogurt
Olive or Avocado oil
Check out my Youtube tutorial here:
~ DIY Eye Makeup Remover ~
I've never been one to pay money for eye makeup remover. Mainly because I think it's stupidly overpriced and I always was able to remove my eye makeup fine with my face cleanser.
That hasn't been the case over the past few months, I felt like I was never getting my mascara fully off of my eyelids. So I started my hunt on Pinterest for remover I could make myself and even better with natural products. You only need three ingredients.
Avocado Oil (or Olive Oil), Witch Hazel, and water

Add 2 tablespoons of each into a plastic container, shake and there you go!

Check out my Youtube tutorial here
~DIY Mason Jar Soap Dispensers~
So of course I was inspired by Pinterest for this project) I always have a hard time finding pretty soap dispensers for my bathroom that match the décor. With these you can make them whatever you want!
Here are the items you will need:
Here are the items you will need:
Mason Jars with tin lids- Michael's $1.49-$2.49

Hammer, Pliers, Tape measure

Soap dispenser top, glue of your choice
I used a dispenser from my old soap bottle

Decorations of your choice. I used ribbon and flowers.

Here are the finished products. So quick and easy to do!


This one I used the dispenser from a small Softsoap bottle

~DIY Air Fresheners~
Another idea sparked by Pinterest! I find that no matter how much I clean my bathroom I still have some sort of scent in there that I can't get rid of. Maybe it's because the house is older, but I decided to go about making my own air fresheners because I find the ones that I buy at the store give me really bad headaches and also make me sneeze!
Here are some things you will need for this project:
- Used Candle jar
- Mason jar with tin lid
- Screwdriver
- Hammer
- Fork
Baking soda & Essential Oil ( you can use scent of your choice)

Simply add baking soda to the jars and then add 8-10 drops of the oil. For the mason jar use the screwdriver and hammer to make various holes in the tin top.

You can add a tea light candle to the jar and get a double use out of it. So simple and so easy to do!

~ DIY Baking Soda & Orange Juice Face Mask ~
There are a TON of different uses for Baking soda. One I found interesting is for a DIY face mask. I had found it on Pinterest a few months back and decided to give it a go.
Baking soda is particularly good for acne prone skin and blackheads. It even helps with acne scars and Rosacea. Typically when the skin PH balance is out of whack, you end up with breakouts or problematic skin. Baking soda acts to help alkalize the bodies acid and balance it out again.
The only things you need to make this mask are:
- Baking Soda
- An orange (or orange juice)
- Small bowl
- Teaspoon
- Brush (to apply, or you can use your fingers)

You will notice a tingling sensation when you first apply this to your face, but after 15 min and rinsing it off you will feel how smooth and soft your skin is. I noticed how it reduced my blackheads and the size of my pores.
Some of the other things you can instead of orange juice are Apple Cider Vinegar or water.
~DIY Great Gatsby Inspired Bracelet ~
Sorry this one is late too! I had so much fun making the headband I simply had to add another accessory to the collection.
Once again all the items I found at either the craft store, or my own craft supply.

For the base I found this "ribbon strand" at Michael's on clearance for $1.99. It's perfect because it already had the findings on each end. Now if you don't find one of these you can easily use wide ribbon, or flat or gathered lace and simply add the findings at the end yourself. The little clamps are super easy to apply.

You will need a toggle clasp or clasp of your choice.

Next I just used some of the rhinestones I had in my collection. These are from the bridal department at Michael's.

I had this pendant lying around in my supplies and I simply bent off the ring. If you want to make your bracelet longer simply use any type of chain you like.

Use some of your trusty E6000 glue and jewelry pliers

And that's it! Check out my Youtube Tutorial to see how I did it, and if you try this take a pic and post it on my facebook!


~DIY Great Gatsby Inspired Headband ~
So sorry this posting is so late. I have been swamped and I apologize for the delay. Ever since I saw the first Gatsby preview I got inspired by the fashion in it. I've always loved that time period and so I thought it would be fun to try my own 1920's style headband inspired by the movie.

I personally think that this is something you could wear to a prom, in a wedding, or a special event. I love being different from everyone else and I guarantee you this will make you a standout in a good way. Best of all it's really inexpensive to make and quite quick as well.
First you need a base for your headband. This one is sequined and I picked it up at Forever 21 I think last year for like $2.00. You can use pretty much any type of stretchy headband you might already have or you can make one with simple wide elastic.

Next I took this chiffon flower pin that I had bought for a different DIY but ended up never using it. The pin idea is great because you could actually end up interchanging it for different looks.

These rhinestone embellishments came from the bead section of Michael's. They were on clearance for $2.99 but I think originally like $5.99

You will need a needle and thread. Because of it being stretchy, sewing is better than glue just so you can make sure it doesn't come off.

These are some other options you could use for your headband. A feather clip or pin, clip or post earrings that you remove the back from, and simple rhinestones.

Check out my Youtube tutorial on how to put this look all together and let your imagination run wild making your very own!

~ DIY- Makeup Brush Cleaning Solution ~
Hi guys,
Ok so typically I take photos as I'm filming to put up on the blog. For this DIY I completely forgot!
So I will just post my Youtube video tutorial for you to watch.
I do want to say that this method of cleaning brushes is amazing! It works immediately and leaves the brushes squeaky clean. The best part is all the ingredients are probably right in your kitchen cabinets.
Here is what you need:
1 Cup of Water
1 Tbsp. Distilled White Vinegar
1 Tbsp. Dawn Dish Soap
That's it! Check out the video here to see how I go about the whole process
~ DIY Decorative Potholder ~
I have another super easy DIY for you this week! Of course Pinterest ALWAYS inspires me but I like to take my own twist on things and make it my own. These potholders are not only easy but they might even be too pretty to cover up! The best thing is you can make just one or a whole set, give them as gifts or keep them for yourself :)
Check out the Youtube tutorial here:
Check out the Youtube tutorial here:
Here are all the items you will need.
Decorative Vase Fillers $4.99 w/ 40% off & Felt square
from Michaels


I had some left over smaller vase fillers from previous projects that I used as well

E6000 Glue, Scissors, Pen, and a cover to a pot to trace with

Here is the finished product. Of course if you want them to be more stiff, just cut some cardboard in the same size as the felt and glue the felt onto the cardboard before adding the stones.

Looks so pretty under a teapot!

Also just under a candleholder

Let me know if you try this and make sure to post the pics on my facebook!!
♥~ DIY Dress Up a Lampshade ~♥
In another one of my previous posts I showed you a pretty silver lampshade I found on clearance at Marshalls. While I loved the shape of the shade and the simplicity of the silver, I found myself daydreaming of how I could tie it in with my room décor a little better.
I'm absolutely in love with peacock feathers, and my room's color scheme came from the colors in the feather. I have different touches of feathers throughout the room and so I decided to add one more with this lampshade revamping idea.
If you are wanting to revamp either a new or old lampshade the possibilities are endless. Let your creativity flow and your imagination run wild!
Here are the items I picked up for this project.
Lampshade- Marshalls $10.00

One peacock feather- This is from ZGallerie for $1.95!
Also if you have Anna's Linen stores in your area they have them for $1.50. Most of the craft stores are double and even triple that.

Rhinestone Charms from Michaels- $3.99
(Bought two packs @ 40% off each)

Fabric Flower pin from Michaels- $2.99 w/ 40% off
(Bead Landing items were on sale that week:)

E6000 Glue $4.99 (needed to replace my old one) from Michaels- Scissors & Pliers

Here is the finished product on a lamp

Let me know if you try a project like this and take pics and post them on my Twitter and Instagram!
Check out my Youtube tutorial here
~ DIY- Dress up your shoes! ~
In my previous post I showed you the shoes I bought at Ross at a discount due to the fact that one shoe had pen marks on the side.

After trying to get out the marks, I decided why not try and revamp the shoes with a little embellishment?
Off to Michael's I went and picked up these supplies.
Paper Flower accents $1.00

Self-stick rhinestones - $3.99
I found these when I passed by the bridal department and I have to say that I love them! I never thought about looking in that section before but these seem to be better faceted and I also like the different oval shape.

Of course my good ole E6000 glue. I'm going to need to replenish this soon!

Here is the finished product! I love how it totally changed the look with such little effort. I think it makes the shoes look a little more flirty and fun.


~DIY Decorated "To Do" List Frames~
Yet another idea inspired by Pinterest, and even better I purchased all the main supplies at the Dollar Tree!
I not only love to make lists, but I NEED to! Sometimes I make lists of lists lol. This idea is perfect to have right in front of you on your desk as a simple "to do" list or if you just want to write cute notes on it :) Here are all the items I used:
5x7 frames from the Dollar Store & a Writing Tablet
$1.00 each!

Embellishments of your choice. I used one's I had in my craft box like rhinestones, ribbon & fabric flowers

Scissors & Glue (I use E6000)

Dry Erase Markers from Dollar Tree.
$1.00 for 4 pack

Here are the finished frames. As you can see you can also just use them for pictures of course!
Here are the finished frames. As you can see you can also just use them for pictures of course!


Watch my YouTube Tutorial here to see how I made them!
~DIY Lantern Nightlight~
Not too long ago I purchased new things for my bedroom makeover at my favorite store Z Gallerie. I had been eyeing a duvet set in this amazing indigo blue color and wanted to get the Casablanca lanterns to match. To my surprise one day everything I wanted was 50% off! So I snatched up my duvet and shams along with two of these lanterns. In the back of my mind I wanted to make them into lights and ultimately I decided to make one into a nightlight.
The only things you need to make this are:
Lantern of your choice
Medium sized Z Gallerie "Casablanca" Lantern $7.50
Medium sized Z Gallerie "Casablanca" Lantern $7.50

Plug in Candlestick light $3.99 at Jo Ann's

Double sided tape $2.99 at Michael's

Here is it illuminated on my vanity table. I love how the light gives off the pattern of the lantern onto the walls

Check out my YouTube tutorial here
Another idea inspired by Pinterest!!! These mugs make perfect gifts for the holidays or anytime :)

Now I did experiment a bit with these. Some people posted on Pinterest that you could use Sharpies to write with. I tried that however it rubbed off with washing. I found some paint pens at Michael's and decided to give them a try and ta da! They worked :) I also noticed that the Sharpie brand makes paint pens as well in large assortment of colors so I would think those would work as well.
Here is my tutorial showing you how to make them:
I plan on making a few more of these as gifts since they come out pretty and what's better than a handmade gift?
Here are the items I used:
White mug- $1.00 at Dollar Tree

White mug- $1.00 at Dollar Tree

Craftsmart Paint Pen Set- $5.99 at Michael's

Make any design or pattern you wish and then place on a baking sheet and bake at 350 degrees for 30 minutes and ta da!!! You have an instant gift!
Here are each one I did:


DIY Decorated Container Tutorial
I was inspired for this DIY by my favorite site Pinterest. These containers are so easy and inexpensive to make, that you could get a little crazy with it and wind up with so many you don't know what to do with them! They are perfect as gifts especially for Christmas since you can fill them with a ton of different little goodies. Let your imagination run wild with all the different ways to decorate them. Best of all, the main supplies you can find right at the dollar store
Glass vase $1.00

Candy dish $1.00

Apothecary Jar $1.00

Industrial Strength Glue
$4.99 at Michael's

Rhinestones of your choice
These are from Michael's $1.99 each

Leaf gems $1.00 from Michael's

Bead Filler for brush holder
$2.99 at Michael's

Check out my YouTube Channel for the tutorial
on how to put it all together
Here are the finished projects


Thanks for stopping by and make sure to check out my YouTube channel and subscribe!
~ Coffee/Sugar Body Scrub ~
I like so many other people am a Pinterest freak. There are many nights where I can't even go to bed without scrolling through a whole category to see all of the creative and interesting ideas. While looking up beauty ideas I came across a recipe for a coffee body scrub that I simply had to try. Coffee is beneficial in more ways than just to jump your morning with a dose of java. Caffeine is a natural antioxidant can reduce swelling and redness in your skin.
Here are some other benefits of using coffee in your beauty regimen:
- It helps break up and redistribute fat cells thus reducing the appearance of cellulite
- Caffeine shrinks blood cells and can help reduce varicose veins
- The aroma of coffee helps clear your mind and can work as an anti-depressant and help with nausea.
- You can use it for under eye circles and puffiness since it reduces swelling and can lighten and brighten your skin.
Here are the ingredients which you can find right in your kitchen for you to make your own scrub:
1 cup of ground coffee (any kind just not decaffeinated)

1 cup of sugar ( I used raw sugar to have a more coarse texture)

1/2 cup of Olive oil & 1/2 cup of water
(you can use one full cup of oil depending on how oily you want it)

Mason Jar with lid to store scrub
(you can use any container that works)


This smells AMAZING in the shower and is great for morning time to help you wake up. I've been using it for a week now and it makes my skin feel like butter. I've read that for cellulite it isn't a cure but it does help if you use it regularly.
Watch my YouTube tutorial on how to make the scrub.
Thanks for stopping by!
DIY- Painted Vase Tutorial
Who knew it was so easy to make vases in your own custom colors? Not only easy but very inexpensive. You can make these for flower arrangements, or even as makeup brush holders. Grab some paper bags and paper towels for any mess that might happen and also a bowl for the paint. Here are the other items you will need:
Clear Vase
$1.00 at the Dollar Store
(Walmart sells them too!)

Delta Air-Dry PermEnamel Surface Conditioner
(you can also use rubbing alcohol)
Perm- Enamel Air Dry Paint in Blue Bayou &
$1.99 each on sale at Michael's


Paint Brush 5/8 wide
$3.99 from Jo Ann's Fabric & Craft Store

Here is my YouTube tutorial
tags: vases, DIY, paint, brush, decorative vases
DIY Decorative Ring- Turn your earrings into a Ring!
What better idea than to take those post or clip on earrings that you don't use anymore and turn them into earrings! This is such an easy project and requires very few supplies.


The ring base I found at Jo Ann's Fabrics. Came with two for $4.99

Some vintage clip on earrings from my Mom
You can use pierced post earrings and depending on the size use as many or as few as you like.

Felt from Jo Ann's $.39

Scissors & Jewelry Pliers

Amazing Goop Craft Arte Glue from Michael's $4.99

Here is the YouTube tutorial for the DIY.. Check it out and make sure you comment and let me know what you think!!
Finished Ring....

DIY - Added Touch To Your Doorways
A friend of mind recently picked up these beaded doorway curtains at a garage sale for $2.00! I thought I would share with you what I ended up doing with them to give you a inspiration of little touches you can add to your place to give it a unique look.

There were two and originally I thought I might put one in my bathroom but the width was too wide for the door, so I decided to make a little doorway decoration going into my closet.


The other set I decided to put in the doorway that leads into the master bedroom and bathroom


If you have any ideas for around the house or projects you have done I'd love to see them!!
DIY Decorative Shower Curtain Rings

Here are the items I bought for this project:

Plastic Shower Curtain Rings from Walmart's Mainstays Brand - $1.16

10 yd spool of brown satin ribbon 1/4 inch from Michael's $.33

Bead Gallery flat shell beads from Michael's $2.50 (bought 2)

Bead Landing 7mm flat rhinestones from Michael's - $2.99

Amazing Goop Craft Arte Glue from Michael's - $4.99

Check out my YouTube Tutorial on how to make these!
DIY Easy Chain Strap for Clutch Purse

About two months ago I bought this clutch at T.J. Maxx on clearance for $10. It was missing the strap and so I thought I would just use it as a clutch. I ended up using it once and the other day I noticed it in my closet and thought, "that is so cute I wish it had a strap to it so I could use it more often". So then I realized well why don't I just make a strap for it?

So I went to Michael's Arts & Crafts and picked up a silver chain big enough to hold a purse. I had some hooks and small circle rings already so I used those as well.

Using some pliers I simply attached the ends of the chain to the rings and then added the hooks, and there you have it.


A versatile look for a clutch. I wanted to share this simple idea to encourage you to go and find things in your closets that you might not be using to their full potential and change them up a bit for a different look or use.
Thanks for reading and watching! Please subscribe to my channel for more DIY projects and more!
Here is the video tutorial...
DIY Scarf Wrap Watch
This is quite possibly the easiest DIY ever. All you need is a watch face which you can purchase separately or if you have a watch with a leather band simply take off the band.

This watch face I found at Michael's on sale for only $7.99. They had an assortment of sizes and colors such as gold and silver. I chose white just because I thought it would be fun for Spring.

Next I found these silk scarfs that I had tucked away with my hair stuff. You could buy your own fabric too. These measured 32 inches long and about 4 inches wide. Use your imagination!


Here is the Tutorial on YouTube:
DIY Jewelry Tutorial Ring and Barrette Clips

So I had made some jewelry over Christmas as gifts and thought I would make a tutorial to show you how I did it. I bought the findings at Michael's Arts and Crafts Store as well as the rhinestones.
This is so easy to do and only takes a few items to make the perfect gift or something you make for yourself.


First I used Rimmell Black Satin nail polish on the base then NYX Glitter Nail polish in "Spot Light "on top
G-S Hypo Cement Glue was used to apply the Crystazzi rhinestones in 10ss size.
Watch the tutorial for instructions on how to make these and check out the pictures from the other items I made over Christmas.


Here is the tutorial on YouTube
DIY Valentine's Day Gift Wrapping Idea
I thought I would bring you an easy tutorial for a Valentine's Day wrapping idea I had. This is perfect if you li ke baking goodies for your sweetheart and want to give it in something special. It's also great just for giving a gift in any time of year

Close up of the rhinestones

I found all the supplies at Michael's Arts & Crafts store.
1. (1) Covered cylinder $2.99
2. (1) package of rhinestone stickers $2.99
3. (1) package of glitter button stickers $1.99
Such a inexpensive and different way to give someone a gift! Let me know if you try this out and please check out my YouTube channel for more DIY tutorials.
Do-It-Yourself
Simple & Elegant Gift Wrapping

This is an easy, yet elegant way to decorate your Christmas gifts this year. Maybe you don't have time to wrap every one like this, but at least you can make certain ones special.
The supplies I chose are:
- Black & White Snowflake wrapping paper ( from Target)
- Silver Glitter Wired ribbon ( from Michael's)
- Red Berry Picks (from Michael's)
- Silver Berry Picks (from Michael's)
The possibilities are endless with the different types of looks you can create, so go crazy and try a bunch!
Here is my video tutorial on YouTube if you would like step-by-step instructions:
Here is my video tutorial on YouTube if you would like step-by-step instructions:
tags: gift, wrapping, paper, bow, ribbon, silver, glitter, berries, picks,tape, scissors,wired, thevibenowvlog
Do-It-Yourself Easy No-Sew Pillows

Do you find yourself trying to think of ways to brighten up or change your rooms? Maybe you don't have the budget to go out and get a new couch or comforter, so why not start with some little details such as decorative pillows?
This is possibly the most simple do-it-yourself project around. All it requires is three simple items:
1) A pillow, any size or shape that you might have on your couch or bed already
2) Fabric (anything that isn't too slippery or thin, or super thick. The fabric I use for this one is a Dupioni Silk.
3) A brooch or large decorative pin
Now once you have all those items, watch this simple tutorial to see how it's done. It's so easy yet looks like it took so much to make. People will definitely be impressed by your skills!
tags: pillow, diy, do it yourself, fabric, dupioni silk, brooch, pin, decorative, craft, project
DIY Ornament Earrings in Under 5 Minutes
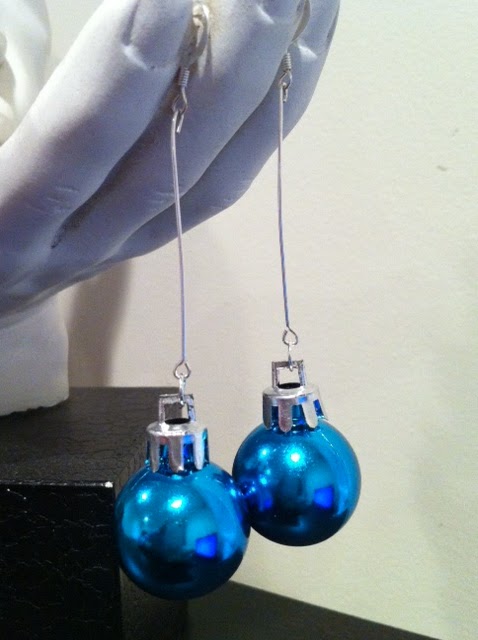
So for the holidays here is a perfect little DYI project that will take less time than it does to take a shower...
All you need a a few items and you will be set.
- Plastic (or glass) mini Ornaments

- 2 earring hooks (silver, or gold depending on the ornament neck loop)

- 2 silver connector loops

- 2 silver earring pins with loops on end

Watch the video to see how to make them:
tags: ornament, earrings, findings, christmas, holiday, loops, hoops, pliers, Amy Wilks, the vibenowvlog, diy, simple, easy, under five minutes
Glam Bedroom Makeover
Here it is.....Glam bedroom makeover. I had the opportunity to redo a room and I did it on a budget... Check out the video to see all the things I used.
I love to shop at Target, T.J. Maxx, Marshalls, Home Goods, IKEA, and Z Gallerie. The comforter set I used is Missoni for Target and I made my own bed canopy for less than $10!!
After pics


Tags: target, tj maxx, marshalls, ikea, z gallerie, canopy, comforter, redo , bedroom makeover, accessories, curtains, picture frames, rug, reveal, tie backs

Evden eve nakliyat sektöründe lider konumda olan firmamız şehir içi ve şehirler arası olarak lider konumda bulunmaktadır. Bizi tercih eden müşterilerimize daima en iyi hizmeti sunmaktayız. Detaylı bilgi için bizimle iletişime geçebilirsiniz.
ReplyDeleteGebze evden eve nakliyat
Mutlukent evden eve nakliyat
Kurtköy evden eve nakliyat
Güzelyalı evden eve nakliyat
Esenyalı evden eve nakliyat
Çayırova evden eve nakliyat