Sunday, May 24, 2015

New L'Oreal prodcuts I've been loving

Hey everyone! Long time no post. It seems like I get on a kick with my posts or videos and then life gets in the way. I guess that's part of not being a full time blogger and really only doing it for fun. With the three day weekend ( THANK GOD!) I decided that I could actually take the time and get back to doing what I love, which is writing. So what better place to start than a product review for you. Here are some products I've been trying out for the past few months and love.

Products:


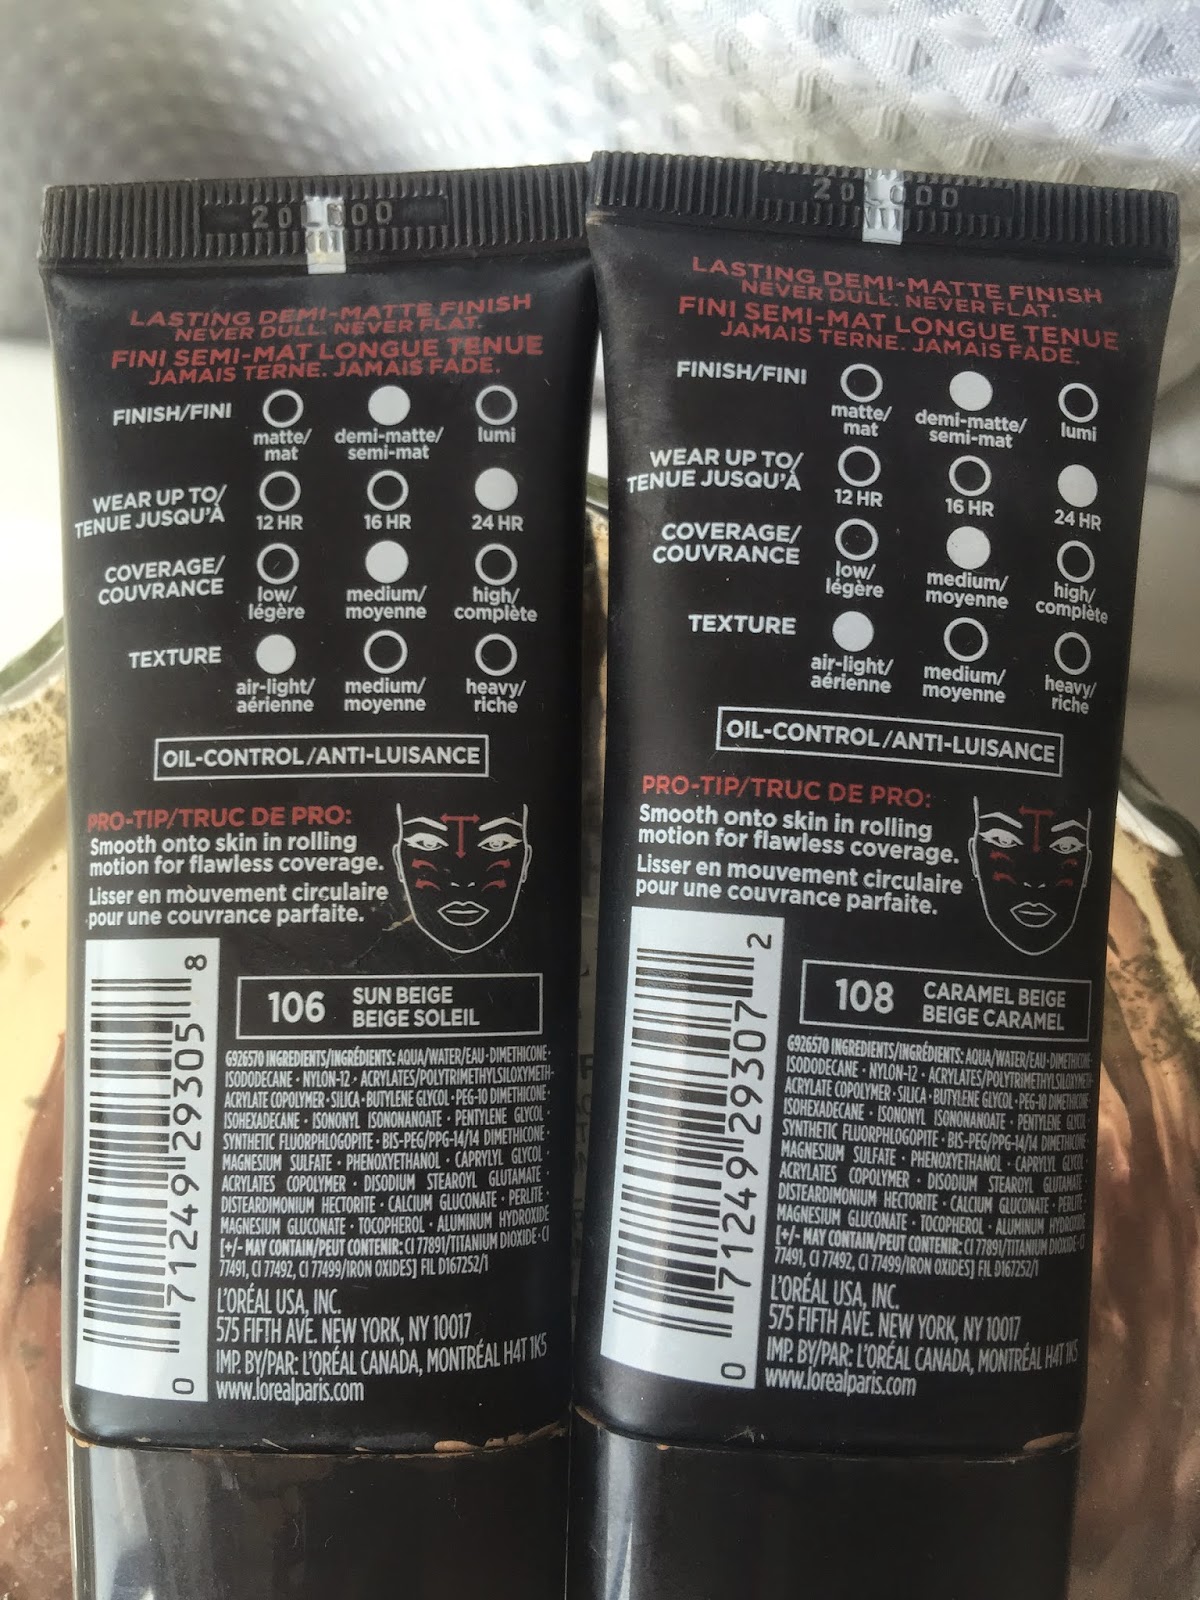
First let's start off with foundation. Just like every woman I'm always on the quest for a better foundation. This one does not disappoint. It's a 24 hour wear formula that is also matte. Normally I wouldn't choose a foundation that has a matte finish with the fear of it looking too flat, however this is just the right amount of matte that keeps you oil free all day, and actually I believe that Loreal advertises it as a demi-matte finish.
Does it actually stay fresh for 24 hours? Since staying up for 24 hours straight let alone with makeup on isn't something I do regularly, I can't say I have tried and tested that claim.
I have however worn it for about 15-17 hours and I can say that it holds up extremely well.
For application I usually use a beauty blender which really allows for a smooth and even coverage. Since it is matte I rarely need to do any sort of touching up with powder throughout the day unless I had been in the sun or it was super hot out.


I started out wearing the shade #106 Sun Beige which was perfect for me, but then later also picked up #108  Caramel Beige when I wanted my face to actually match my tanned body. No one wants that pale face with tan body look!  You of course could also combine the two for a more customized shade.
I would say the only part for me that is harder to cover is my nose but this seems to be the case with any foundation. The feeling on my skin is very light and I barely feel like I'm wearing anything which is great especially for a foundation that I would consider to be medium to full coverage.
 
Now onto the finishing spray !


After wearing makeup for as long as I have in my lifetime I decided about 9 months ago to finally join the band wagon of using a finishing spray. I will be honest and say that when I would watch Youtubers use them I was like "huh?". I didn't understand what the hype was about. Finally one day while at my local Sephora I was standing in line and saw the travel size of Urban Decay's All nighter finishing spray. I thought what the heck I'll give it a go.  I had no idea what I had been missing! It gave my makeup just that finished complete look and I instantly became an avid user. Fast forward to my Urban Decay being used up and the decision of which one to try next. After seeing Tati (glamlifeguru) on Youtube do a review on the spray I literally went out the next day to my Target and picked one up. Hint: Target has the cheapest price for it!
L'Oreal's version I will say gives Urban Decay a complete run for their money. Literally, because it's a good $15 cheaper .  Main differences would be that Urban's is Vegan and about a half an ounce more in the bottle . I think that it also has a bit more of a fragrance to it as well which I can't really say is a good thing.
The only drawback to the Loreal spray is the packaging. The rubber like material on the outside tends to pick up every little foundation or powder ridden fingerprint. However if that's the only bad thing about it then I'll take it!
 
Lastly we have the mascara. The Voluminous Black Angel Miss Manga mascara in Extra black is the one that I picked up.


Again this is an item that you can forever be on the hunt for to attain perfect long lashes. I had been trying out sample sizes of Benefit and Stila, when again I came across a Youtube review on this baby. My lashes aren't the longest or thickest so of course I want something for both. This mascara I can say really does work well for that doll eyed look.
 The 360 flexible brush really allows for good application to both the top and bottom lashes and I love that the brush is pointed because it makes it easier to get into the corners of your eye without messing up your whole eye makeup if you happen to not be so steady with your hand that day.
 

I'm not one to apply multiple coats and I would say if you are this might get a little too clumpy for you. It definitely adds thickness to your lashes and I typically tend to curl my lashes before and after applying for the full effect.  Finally a real deal breaker for me with mascara is how easily it can be removed. I've had ones that I can literally almost not remove completely with both eye makeup remover and facial cleanser. That irks me to no end! Luckily this one passed that test and comes off like a breeze. That's not to say however that it doesn't stay put.
 
So that's it for this review. If you have tried any of these products leave a comment. I'd love to hear from you.
I'll try not to be a stranger so check back soon and have a great week!

Monday, December 15, 2014

Holiday Table Arrangment

So one night I think I was watching the Vampire Diaries and their Thanksgiving episode when I happened to notice the table arrangements on the dining room table. I thought they looked so cute and my favorite thing about Christmas is lights so here is my own version of a lighted table arrangement :)


I purchases most everything from Michaels with the exception of the lights which I picked up at Target.
Here is what I used
 
  • Globe vase $5.99 plus got 50% off with coupon
  • Glittered Pinecones $1.99 for 5
  • Mini garland with accent ornaments $3.99 with 50% off
  • Holiday Filler  $4.99 with 50% off
  • LED Twinkling lights from Target $7.99 with 50% off
 
Let me know if you try this and check out the video tutorial on Youtube here


Wednesday, December 10, 2014

Gift Wrapping Presents Perfectly :)


Hey everyone finally I have a new video up on my Youtube channel! Come check it out here


One of my most popular videos on my channel is a tutorial I did the first few months that I was doing Youtube and it's a gift wrapping tutorial. Well last Christmas my mom gave me this great tip on how to do a seamless wrapping job so I thought I would make a video on it as well as how to make a loop bow.
Also check out my nails in the video they are the Nailhur set in "Uber Chic" that I mention in my previous blog post.

Let me know what you think!!!  I'll be back next week with another Christmas DIY project so stay tuned!

Saturday, November 29, 2014

Nailhur - Reusable Manicures!


Happy Holidays ! I know I have been MIA again for a bit, but things have just been so busy lately that I haven't had any time to do videos or blog posts.
My posts usually come when I find items or products that I truly love  and this product I'm writing about today is truly a gem !

 
 I've been wearing artificial nails for a few years now, both from the salon and ones I apply myself. Most of the brands that I've tried are only good for one wear which is typically around 5-7 days in duration . Well what if you could have nails that you could reapply whenever you want?
Enter Nailhur! Yes, these babies are reusable. This was something that I personally have never run across in my search for the perfect nails.
Nailhur sets come with 24 nails in 12 different sizes that are all numbered to match up for a quick and easy application. I literally applied these nails in less than 10 minutes!
Here are just some of the pros:
  • Each nail is numbered
  • The thickness of the nail is perfect, not too chunky and not too thin
  • The shape of the nail hugs your own nail perfectly
  • No chipping
  • They come in square, oval, and stiletto shape
  • You can file them to your preferred length
  • Very durable
  • Each set comes with nail glue that is strong and HQ free, as well as a file
One of the main things that I love, is that they stay on very securely and for a good length of time. I tested these out thoroughly by doing heavy cleaning and dish washing and I even took a bath and they were still in tact. I think most people think that artificial nails just pop off randomly and that they aren't very durable, however that's not the case with Nailhur nails. I would say the trick is in the amount of glue that you use, because too little will of course cause them to come off easier, but a good amount allows the nail to feel secure and really just like your own nails.
Here is a picture of the nails after a week and a half of wear. I'm wearing the set "Spellbound"


With the set having various sizes, it is a win win to have a perfect fit no matter what shape your nail bed might be.
After all of the activity I was doing I can honestly say that only a few of the nails needed reapplying, which in my experience is pretty darn amazing. Another thing that I would experience with the other brands of nails would be them possibly splitting down the middle or chipping/tearing on the sides. These nails held up like champs! Not only were there no chips, but absolutely no tearing or splitting.
 
Another thing I noticed was the condition of my own nails when one would come off. Typically my nails would be left with a ton of dried glue on them and they would feel very weak and thin.
This was not the case with these nails. In fact I noticed my own nails continued to grow and felt strong and healthy. Removal was very easy with just simply soaking them in some warm water before gently prying them off.
 
Again, the greatest thing about them is that after removing them I can say without a doubt that these can be reapplied for another wear if not more.
They do have various shapes to choose from, and a TON of different designs. With accent nails being all the rage now, they are definitely on that trend with some sets that have multiple accent nails to sport.
 
So my vote is in 100% for Nailhur. It would be very hard to go back to another brand after this.
Here are two more styles that I bought and am super excited to wear.
 
 "Uber Chic"
A square shape set that has adorable black & white polka dots.

 
"Lucky Eye"
This set has the oval shape and is perfect if you want a bling bling look for a night on the town or just because. The black nails and printed nails are a matte finish, which looks absolutely flawless. The accent nails have sparkling rhinestones that will be sure to catch and eye or two :)


I highly recommend these not only for first time users of artificial nails, but also for the pros out there. For all of the money and time you spend at the nail salon, you could be out having fun showing these off.

 
Check out Nailhur's website HERE and take advantage of this limited time offer to get 40% off your order by entering the code NAILHUR40. They ship worldwide!


Tuesday, September 2, 2014

Destiny Candle!!!


Last year I attended BeautyCon here in Los Angeles, where I had the pleasure of meeting Karen Michelle who is the owner of Destiny Candle. I was given a candle of my choice and ended up writing a blog post on it which I will link here.
Fast forward to a year later and Destiny Candle is going strong and continuing to grow into an amazing candle company.  I was lucky enough to be sent one of their "Calm" candles that is scented with some of my absolute favorite essential oils.  In a trio of scented bliss, they combine Lavender, Frankincense, and Grapefruit.
Absolute heaven! Of course the best thing about the candles is you can use them as moisturizing body oil. Talk about getting into the "calm" zone. After a long day at work I love to light it up and put it next to my bathtub. The scent is seriously relaxing.
Here is my "Calm" candle before I lit it.

 
In the particular candle I received there is a charm valued at anywhere from $10- $10,000 dollars.
You can see the charm peeking out here in this picture


Here are some other facts about Destiny Candles

  • Each candle is individually handcrafted in the USA
  • They are made with 100% ALL natural ingredients & natural essential oils
  • They melt to create an amazing massage oil
  • Each one contains a beautiful intention crystal that can be worn. At this time they have two different types of candles that have charms that are valued at anywhere from $10- $10,000!
  • There are 8oz candles that burn for up to 45hours & 3oz. candles that burn for up to 18 hours
Ingredients include:
  •  Coconut Oil
  • Jojoba Oil
  • Shea Butter
  • Vitamin E Oil
  • Soy Oil
  • Aloe Vera Oil
  • Apricot Oil
  • Caprylic
In addition to "Calm" they have eight other candles-
  • Beauty (Mint, Rosemary, Vanilla)
  • Good Luck (Peppermint, Frankincense, Grapefruit)
  • Wealth (Fig, Bergamot, Vanilla)
  • Love/Sex (Vanilla, Coconut)
  • XOXO (Blood Orange)
  • Weight Loss ( Blood Orange)
  • Energy/Uplift (Cinnamon, Vanilla)
8oz. candles with intention crystals are just $29.99 with $6.95 s&h
3oz. candles are $10.99 with $2.95 s&h

All of the candles even have a 30 day money back guarantee, not that you will need it because believe me once you try these you won't want to give them back!

Last shot is my candle and cute Peace charm that was inside!

to


A big thanks to Destiny Candle for gifting me with this amazing candle!
Make sure you check out their website HERE so that you can order yourself one!


Monday, July 21, 2014

Zucchini & Cucumber RAW Pasta Salad- Perfect for Vegetarian and Vegan!


For the past 6 months or more I have been turning my diet into more of a Gluten free one due to my stomach reacting to pretty much anything with flour in it. While I've never been a big pasta fan, the few times I would have it my stomach would really put up a fight. So while changing my diet over to more fresh veggies and fruits I started noticing pictures on Pinterest of people making Zucchini or Cucumber "pasta". While on the phone one day with my mom I mentioned it to her and she told me she had seen this cool little contraption called the "Vegetti". 


She ended up picking one up for me and since then I've been LOVING the combination of veggies that I come up with along with using different types of dressings or "sauce". In fact the Vegetti comes with a little booklet filled with various recipes and sauce recipes. I've recently seen the Vegetti at my local CVS and Walgreens but you can also get it on Amazon here 
And at Bed Bath and Beyond here .
I also came across a blog and YouTube channel called Fablunch. A girl by the name of Olga has amazing recipes that range from vegan, to vegetarian, gluten free etc. She has amazing recipes for dressing so make sure you check it out.  Now onto the recipe!

Ingredients used:


  • 1 Cucumber
  • 1 Zucchini
  • 1 Orange Bell Pepper
  • Handful of chopped Baby Bella Mushrooms
  • Handful of Cherry Tomatoes
  • 1 Avacado
  • Lemon to taste
  • Extra Virgin Olive Oil
  • Rice Vinegar
  • Sea Salt
  • Pepper

Watch my Youtube video here to learn how I made it :)


Make sure you leave a comment here or on my Youtube video if you have tried this or if you have another great recipe! 

Sunday, June 29, 2014

I've been MIA and also I hit 5000 SUBS!

Hey everyone! So yes I know I've been totally MIA the past month or two and I apologize! I'm not gonna lie, lately it has been hard for me to get my inspiration going and to get motivated to make videos. But it's not because I don't want to. 
Over the two and a half something years now I've been on Youtube I've steadily seen my subscribers and views go up. However something I have mentioned before multiple times in videos is I have almost ZERO interaction with anyone. I'm not sure why, I mean I do get comments on my videos. But my Facebook is completely dead as well as my Twitter and Instagram. I was down in the dumps for a bit about it all but then I realized why I started making videos in the first place. Because I love to be creative and I truly enjoy just the whole process! So I'm just going to stay focused on that while secretly hoping that I will get more interaction from people. It's not because I want the attention or views etc, I just would love to have more feedback and input. I mean that's part of why Youtubers put themselves out there for literally the world to see. Because we wanna hear from you!

Anyway guys I thought it was time that I be straight up and tell you why my videos have been lacking. 
On a side note I have been finding difficulty getting inspiration for DIY's because I want to give something original and fun. Once again I just need to concentrate on who I am and bring that to the table. I'm not gonna care if my idea has been done a million times before etc etc.
In the interim I will continue to do product reviews and such because I am trying out new things! 

Last but not least I want to say a HUGE HUGE thank you to all of my subscribers. I hit 5000 about a week and a half ago and I'm through the moon. Thank you so so so so much!!!
If you are reading this please head over to my Facebook, Instagram, or Twitter and follow me! 
Write me something I wanna hear from you :)

Much love,


Monday, May 5, 2014

My Natural Spot Treatment for blemishes !

I've been trying this method out for quite some time now and I thought I would share it. Even though I know that there are tons of posts and videos on it but I thought what the heck. I found this recipe a while back on a blog. Check it out here: http://dreamcalluna.wordpress.com/2013/04/22/diy-tea-tree-oil-acne-treatment/

 Lavender and Tea tree oil have been used forever for various things including skin care. The combination of the two just adds a little more of a punch to those annoying pimples/zits that can pop up here and there. 
Tea tree oil works well on acne, pimples, dark spots and any sort of cut or burn. Lavender is antibacterial and can help reduce redness around the area. Adding some distilled water simply cuts down on the potency of the oils. 

So this DIY just involves three items:


                             Distilled water                                            

Lavender & Tea Tree Essential Oils
both from Vitacost.com 
Lavender 1 oz.$6.49
Tea Tree 1 oz. - $5.99


Glass bottle dispenser with dropper
1 oz. from Sprouts - $1.99

Measuring cup (for a mess free pour)

Simply add one ounce of water to the container and then add 10 drops of Tea tree and 5 drops of lavender. Stir and then close bottle and shake. Shake before each use as well :)
 Watch the Youtube Tutorial here:


Monday, April 28, 2014

TMI Tag!


Hey everyone! So I've been missing a week or two here and there of videos and I apologize! I had filmed this tag video back a few weeks ago and finally got around to editing it. I will be bringing more DIY videos in the future so don't worry!  Click the pic above to watch my TMI video.
In the meantime sit back and learn a bit more about me :) Also if you have any suggestions or wants for videos please feel free to comment on here or any of my social sites. 

Have a beautiful week!!

Monday, April 14, 2014

Loft Makeover - The "after"

Yes I know this is a week late and I apologize! I ended up hustling to get the room together because my brother was coming to visit for the week. After he arrived I got caught up in all the activities and decided to film the "after" when he left. So here it is! 


Most everything in the room came from Target, and let me tell you that I found some deals. 
Starting with the bed, I decided to angle it diagonally to give the room a different feel. I found this super soft and comfy comforter that is black on one side and grey on the other.
It's a twin size because since I don't have a box spring under the mattress, a full size was way too large. Only $19.99!!  
Link here: Room Essentials Comforter
For sheets I found a microfiber set in this gorgeous coral color. They are so soft! Since I don't use the top flat sheet, I cut it up and used it to cover one of my Euro size pillows. Click here for the tutorial I did a few years ago on this pillow. It's so easy! I then added a black accent pillow and the silver sequin one I originally had on my bed. I thought it looked better here :)


Next were the curtains. I didn't want anything too heavy or dark, and as luck would have it I had a set of sheer black curtains from a previous house. 
I believe I got them at Target a few years ago as a set for around $10-12. I didn't want to put holes in the wall so I opted for cafe spring rods which work perfectly. 
Next to the bed I put a simple black lamp with this beautiful black and white lace shade that I found on clearance at Target. $3.98 guys! Can you believe it? I put it on this simple pedestal that I had in my hallway.
Here's the link for the lamp: Room Essentials Column Lamp Base $16.99

In the corner I put this simple IKEA like bookcase with an orchid to accent the room and some books and other decorative piece.


Lastly was the large blank wall next to the bookcase. I had found yet another amazing find at Target. This beautiful gold starburst mirror set was only $7.98! I'm not sure why because it is on the website for $24.99, but I'm not complaining!


Link to the mirror set here: Threshold Starburst Mirror - 3 pieces $24.99


After bringing the mirrors up I decided that it needed a little something more. Since I had a few sheets left over of the IKEA wall decals, I arranged them as if they were coming down from the ceiling and suspended on the wall. I think it adds a perfect touch of dainty cuteness and pairs perfectly with the mirrors.
Link to the decals here: SLATTHULT Decorative Stickers - $12.99

And that's it!  I love the simplicity of everything and how the coral, black and grey make it slightly masculine but with a feminine side as well. I might add one or two more things like something else on the wall above the bed, and possible a small desk so I could make it my office. I'll keep you posted on any changes! 

Monday, March 31, 2014

Loft Makeover -The "before"

So I've been wanting to redo the small loft space in the house for quite sometime now. Just like it was with my bedroom and bathroom, this will be a makeover on a budget. No major changes, just some simple ones that don't cost a lot but that can make a space inviting and special. Here is a pic of the ladder leading up to the loft. I left my white Christmas lights up because I love the way this looks at night. 

As you  can see the opening at the top isn't very big at all. We were just able to get a mattress up and a few smaller items. You can't really bring big stuff up here.


Here is a shot of most of the room. 

The ceiling is low, I would say maybe 7 feet. The big windows really open it up though so it doesn't feel as small as it really is. 
Can't wait to show you the after so stay tuned for next week's video for ! Watch my Youtube video here:


 Also if you are reading this blog, please sign up through email or join me on Google!

Monday, March 24, 2014

Part Four- "Do it Myself Monday" Room Makeover Series


I'm back with part four! I decided I would go ahead and show you what I have done thus far. I still have one or two more key items to finish/find so once that is all completed I'll film a final video for you. First thing I did was change the position of the bed. I had originally thought blocking the window would be a bad idea but I was wrong. It gives SOOOO much more room to the whole area and really just makes everything feel fresh and welcoming.
I found this gorgeous reversible duvet set at T.J. Maxx for only $29.99. It's super soft and has the exact colors that I had in mind for the room.  A light grey with white and on the reverse side is a mustard like yellow with white. 
I picked up a black sheet set from Cynthia Rowley also at T.J. Maxx for only $24.99. I love how the black makes everything stand out. Finding the right accent pillows isn't always easy, but this yellow one fell right into my cart while I was at Target and was only $10 on clearance. The grey sequin pillow I had from a previous comforter set.


On the left side of my bed I bought something that I had been wanting forever. A glass DETOLF cabinet from IKEA that could display the pretty tea cups and figurines that I have collected. A small round wood table I already had makes a perfect nightstand, accented with a speckled glass vase I purchased from Michael's for only $4.99 and paired with TORKA dried flowers from IKEA to accent the black and yellow color scheme perfectly.


The IKEA bookcase I had on the other wall showcases perfectly on the other side of the bed. I took the old vintage mirror and turned it sideways, and then propped it up against the wall. This too opens up the room so nicely.  The accessories on this bookcase aren't complete yet so I will post pictures when I am finished.


And that's it for right now! I will be adding some more pillows to the bed as well as purchasing a new computer desk that will help the area be a bit more organized. I also haven't decided it I will refinish my desk or put something else there. Stay tuned though and make sure you check out my Youtube channel and subscribe if you haven't already :)

Monday, March 17, 2014

Michael Todd True Organics Review


So after a few months of weird weather and my skin reacting to it, I finally said ENOUGH! I have been going more natural and organic lately with my skincare and I had seen so many review of the Michael Todd line that I finally jumped on the site and decided to buy. What I came across was awesome because they had a new line of kits called "Discovery Kits". Perfect for someone who wants to try out the products without buying full size.
After looking through the options I decided I was the "normal/combination" skin type.

The kit comes with 5 different products:
  • Cleanser
  • Toner
  • Moisturizer
  • Scrub
  • Mask 
First step is the cleanse and tone cleanser.

This is the Cleanse and Tone One step Cleanser/Toner. It cleanses, tones and removes your makeup all in one. It has highly absorbent Charcoal that penetrates deep into the pores and gently removes dirt and oil without drying. It also has antioxidant vitamins, organic teas and essential oils to help fight environmental stressors.  This cleanser feels amazing on the skin. It doesn't leave a tight feeling just purely cleansed feeling. Smells great too.

Second step is the toner

This Organic Lemon AHA+DMAE toner smells so good because it has the aroma of fresh lemons. It's blended with DMAE and Alpha Hydroxy acid to firm, lift, and tighten the skin while easing away the appearance of fine lines, blotches and discolorations. It contains black willow tree extract which has healing powers and also fresh warm spicy tea tree oil which is a powerful immune stimulant to help fight infections. 
This doesn't have alcohol so it doesn't dry your skin whatsoever.
Love this stuff!

Third step is the moisturizer


This is probably my most fave out of everything. It's the Citrus Cream Moisturizer with DMAE & Hyaluronic Acid. It smells divine and makes me wake up in the morning and then calms me down at night .  It's light but very hydrating without being greasy or oily. It is infused with essential oils of sweet and mandarin oranges, tangerines, lemons and limes. DMAE firms the skin and improves fine lines and wrinkles. Hyaluronic Acid attracts moisture to the skin and restores it's balance. It really does leave my skin so soft and supple without being greasy. And I definitely notice the difference in my fine lines around my eyes from sun damage. 

Next is a scrub that I use about twice a week
This sis the Jojoba Charcoal Facial Scrub that has Jojoba wax beads and activated charcoal to effectively remove dead skin, impurities and toxins. It's gentle enough for sensitive and acne prone skin types. This scrub is great because you don't feel like your are literally scrubbing your skin off. It's just enough to exfoliate and definitely does the job of removing those nasty blackheads.


Last item is a mask that I use once a week

This mask you will not know if want to eat it or put it on your skin, that's how good it smells. It's the Pumpkin Nutrient Rich Facial Mask. Pumpkin is blended with Glycolic acid. It contains high concentrations of Proteolytic enzymes, anti oxidant beta carotene and over 100 other essential vitamins, mineral, phytosterols, and fatty acids. It exfoliates, moisturizes, firms, improves elasticity and pliability of the skin.  I love this mask so much. Love the way it smells, feels and the after effect of course. Leaves my skin radiant and super soft. 

Overall I'm totally happy with what these products did for my skin. The breakouts I was having on my forehead and jawline have stopped and the quality of my skin has improved. I've had the kit just under a month and the only thing I've used up is the toner. I think I was a bit heavy handed with it. The rest of the products you only have to use very minimal amounts. A little goes a long way.

This kit usually goes for $46.00 but until March 31st you can get it for only $33.00. The shipping is minimal (around $6.95) and it's quick to get to you. 
Check out the link to the kit I got here:  Discovery Kit

Also if you go to their website for the first time, make sure you fill out the form when prompted. That will give you an extra 10% off. 
If you try this or already have leave a comment or head over to my Youtube channel and leave a comment on the video. 

Monday, March 3, 2014

Part Three "Do it Myself Monday" Room Makeover Series

Part Three is here! It's time to show you my finished bathroom. 
Watch part three here:


I picked out the color scheme to go along with my bedroom which you will see when that's all finished, so I guess you can tell that at least part of the colors will be grey and white :)
It all starts with a good shower curtain for me.

I found this in the clearance section at T.J. Maxx for only $10! It's Cynthia Rowley brand and I loved how the color accents matched up with the tiling in the bathroom and especially that lovely 70's green of the bathtub. The hooks were ones I had used in a previous bathroom and I purchased them at Target a few years back. I broke them out again because they go perfectly with the grey and silver accents I have.


I picked up some green towels also by Cynthia Rowley to hang on each towel bar.  Then there is the grey terry/foam bathmat from Target and I believe was around $16. 

The stainless steel trash bin I found at Ross for only $7.99. I was floored by this purchase because it's such good quality and the ones I had seen elsewhere all ran over $20. 

The biggest purchase was the tall white cabinet that I picked up at IKEA. It's from the Fullen series and was $49. 


You can find it on the website here. It's perfect to house some bathroom necessities and I like the mix of a cabinet to conceal things and also the pretty glass shelving to display things. 

My favorite part of the bathroom has to be this IKEA decal on the wall. Isn't it cute?

Just like the one I have in my closet on my mirror, this one I believe came with around 12 sheets or so of different branches and birds. It's called "Slatthult" and you can find on the website here. For only $12.99 you can't beat the gorgeous look it gives to a wall. It's so different from just putting up a framed art piece or picture. You can arrange it in any pattern you wish, so I opted to just kind of have it floating on the wall. 
I also put a few pieces on the wall near the washer and dryer just to tie it all in. On another note, I still might end up putting a valance up on that window. The shade ended up breaking and so I'm not sure if I'm going to replace it or put up a curtain.


For the bathroom sink, there wasn't much I could do other than find a cute little owl soap dispenser (already filled with soap!) at T.J. Maxx for only $7.99. I think it's perfect and just simple and not too distracting. That tiled counter is enough!  The toothbrush cup is actually a candle jar that I used up and cleaned out. I think it's also Cynthia Rowley. 

Over the toilet there is just enough room for a basket for magazines and a candle. On the wall I put up this adorable mirror I found on clearance at Target for only $8.98.


It looks expensive but is actually quite light. That's why I love getting deals because why pay for expensive things when you might want to change it in a few months? You can find things that look like $100 for only $8!
Decorating with mirrors are great because they can really make a small space seem so much larger.

Last is the small awkward sink that I couldn't really do much to other than organize and de-clutter. 
I took everything off the counter except for a silver container that holds my cotton balls and a simple glass cup for my q-tips. I wanted it clean and simple here. The silver container I actually found a few months ago at , you guessed it T.J. Maxx for only $2.50 in the clearance section! 


I kept the square black shelf up and re organized it with the skin care products I use every day. Everything else I put in the new Ikea cabinet


And that is it! I know to some it's not much, but for someone on a budget it's a very nice change to a dull and dark bathroom. I love how light and bright it makes the room feel. Just remember you don't have to completely remodel a room to make a change. Like with clothes, accessories are everything. Sometimes you have to hunt for deals but sometimes fate steps in and you stumble upon them!
 I have a few things left to do in my bedroom so I'm not positive I will have them done for next weeks' video and blog post, but it's coming soon I promise. Stay tuned and happy hunting!